Search this blog

Home Download Tips Our Stores About

Adbrite

Your Ad Here

Hot Offers


Masukkan Code ini K1-2BE745-X
untuk berbelanja di KutuKutuBuku.com

Visit Our Sponsor

Wednesday, May 27, 2009

How to Restore SQL Server Database File  

First of all. Open SQL Management Studio. And get connected.
Then you'll see the There's many menus in the left side.
Photobucket


Then. Right Click in the "Databases"
Choose "Restore Database" then this will appear

Photobucket

And this will appear
Photobucket

In the "To Database" field type whatever the name of your database
And Choose "From Device" Radio Button and click the ... button

Then it'll open like this...
Photobucket
Browse to your Database which you want to restore.. And Click OK and OK

Then...
Photobucket
Check the Checkbox. And Click OK... Wait until it executing 100%.
DONE...

If there's an error messages like this
Photobucket
Click OK..

Then.. Navigate to the left side and choose "Options"
Photobucket
Check the First Object "Overwrite the Existing Database"
Click OK and DONE...

Photobucket

Drop Comment below if there's something wrong...


Read more...
Saturday, March 21, 2009

Protect against Conficker  


Businesses worldwide are under attack from a highly infectious computer worm that has infected almost 9 million PCs, according to antivirus company F-Secure.

That number has more than tripled over the last four days alone, says F-Secure, leaping from 2.4 million to 8.9 million infected PCs. Once a machine is infected, the worm can download and install additional malware from attacker-controlled Web sites, according to the company. Since that could mean anything from a password stealer to remote control software, a Conflicker-infected PC is essentially under the complete control of the attackers.


According to the Internet Storm Center, which tracks virus infections and Internet attacks, Conficker can spread in three ways.


First, it attacks a vulnerability in the Microsoft Server service. Computers without the October patch can be remotely attacked and taken over
Second, Conficker can attempt to guess or 'brute force' Administrator passwords used by local networks and spread through network shares.
And third, the worm infects removable devices and network shares with an autorun file that executes as soon as a USB drive or other infected device is connected to a victim PC.


Conficker and other worms are typically of most concern to businesses that don't regularly update the desktops and servers in their networks. Once one computer in a network is infected, it often has ready access to other vulnerable computers in that network and can spread rapidly.
Home computers, on the other hand, are usually protected by a firewall and are less at risk. However, a home network can suffer as well. For example, a laptop might pick up the worm from a company network and launch attacks at home
The most critical and obvious protection is to make sure the Microsoft patch is applied. Network administrators can also use a blocklist provided by F-Secure to try and stop the worm's attempts to connect to Web sites
And finally, you can disable Autorun so that a PC won't suffer automatic attack from an infected USB drive or other removable media when it's connected.


If you got infected by this worm feel free to download this conficker removal tool


How To use :
1. Login as Administrator
2. Disable all the currently active Antivirus
3. Disable all the Lan connection or internet
4. Scan with PCMAV Express
5. After it kill the virus, update your windows
6. For security reason, change your windows password. Try strength password and not easy to guess


Read more...
Wednesday, February 25, 2009

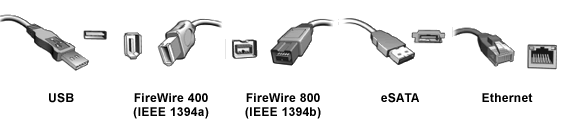
USB vs Firewire vs Ethernet : Who wins the race ?  

You may be wondering which external hard drive is the right interface for you, USB, FireWire 400, FireWire 800, eSATA or Ethernet?

I am going to give you a real basic understanding of the different uses for each interface and we're sure you'll know which is right for you when we're done.


USB 2.0

USB 2.0 is the most widely used interface in the world and works well for the average consumer and even the avid digital collector. USB 2.0 offers relatively fast transfer rates (maximum rate is 480 Mb/s), especially when compared to USB 2.0's distant cousin USB 1.1. USB 2.0 is widely available on desktop, laptop computers and even high-end servers. For most computer users USB 2.0 is the connection of choice for broad compatibility and ease of use. Remember, USB 2.0 is "backwards compatible" to USB 1.1, but your transfer rates will be much slower.


FireWire 400

Also known as IEEE 1394a, FireWire 400 is the friendly arch nemesis of USB 2.0. FireWire 400 (maximum rate is 400 Mb/s) is beneficial for what we call "daisy chaining" external devices. The transfer rate is nearly identical to USB 2.0, but the ability to daisy chain over longer length of cable sets it apart to some extent. FireWire 400 was made popular when Apple started shipping it standard and it has been a choice connection method for Apple users, Video and Audio professionals throughout the years.


FireWire 800

Also known as IEEE 1394b, FireWire 800 is the higher performance version of the FireWire family. The connection is different than a FireWire 400 connection so make sure you have the proper connections on your computer before jumping into a FireWire 800 solution. Going forward more and more systems will have this as standard so buying a solution with this as an option is a good idea. Your transfer rates will double using FW800. You will also have the ability to transfer multiple streams of data over long distances of cable and daisy chain certain devices. FireWire 800 is an excellent option for anyone transferring large amounts of data, such as Audio and Video professionals.


eSATA

The eSATA connection is new and exciting as of the publishing of this article and as we continue to move forward I think we'll be seeing much more of this connection. eSATA is NOT the same connection as an internal SATA cable. You will need a converter or PCI card to enable the use of eSATA on your system, unless it has one built in already. eSATA offers unbelievable transfer speeds (maximum rate 3 Gb/s). Using the eSATA connection is much like plugging directly into your internal hard drive. Check compatibility, but if you are looking for top performance and the latest technology be sure to check into an eSATA solution.


Ethernet


Ethernet or Cat5/Cat6 is a standard method of connecting to a network. All of us plug our computers into our router or model using an Ethernet cable. In a similar fashion an Ethernet enabled external storage device plugs into a router using an Ethernet cable. Gigabit Ethernet (maximum 1000 Mb/s) allows you to transfer data extremely fast if you have a Gigabit capable network. Otherwise you will be forced to use whatever standard your network is running on, be it 100 Mb/s or 10 Mb/s. Either way, this is an excellent way to add NAS (Network Attached Storage) to your home or business infrastructure. You will plug your Ethernet NAS external storage device into your router and access it like a mini storage server. Keep all your music and data in one place and play it from any connected computer system on the network.


so who win the race??
Gigabit ethernet is the fastest. Firewire 800 comes second. Firewire 400 and USB 2.0 is not much different...


Read more...
Tuesday, February 24, 2009

How to change your startup sound  

This tips works in Microsoft Windows XP


Sometimes you must feel bored hearing the same old tunes when you start your PC.
Actually we can change it to any tunes we like. But must using .wav format.


Now I'll tell you the simple steps


  1. Start-ControlPanel-Sound, Speech, and audio devices -> sound and audio devices
  2. Click Sound
  3. In "Program Events" choose "Start Windows"
  4. Click Browse, fine your music and click OK


Don't have a converter? You can use this SITE


Read more...
Wednesday, February 18, 2009

Blogumus : How to Install and Fix the problem  


If you see my labels in the right sidebar.. That's what's called Blogumus tag Cloud. Originally it was made by amanda from bloggerbuster.com. And now I'll tell you how to install it and how to fix any problem.

You can copy paste the code as it is, or change the code before pasting into your blog HTML as per your requirements.
By default the flash widget will be in white background, with gray labels/text, and of dimensions 240x300. And all these can be changed so as to suit your blog's layout and colors.


To start with:
Go to the LAYOUT section, and click on EDIT HTML.
Now find this line/code:

<b:section class='sidebar' id='sidebar' preferred='yes'>


And immediately after this code line, paste these code lines(in new line):

<em><b:widget id='Label99' locked='false' title='Labels' type='Label'>
<b:includable id='main'>
<b:if cond='data:title'>
<h2><data:title/></h2>
</b:if>
<div class='widget-content'>
<script src='http://halotemplates.s3.amazonaws.com/wp-cumulus-example/swfobject.js' type='text/javascript'/>
<div id='flashcontent'>Blogumulus by <a href='http://www.roytanck.com/'>Roy Tanck</a> and <a href='http://www.bloggerbuster.com'>Amanda Fazani</a> via <a href='http://bloggerstop.net/2008/09/blogger-help.html'>BloggerStop.Net</a></div>
<script type='text/javascript'>
var so = new SWFObject(&quot;http://halotemplates.s3.amazonaws.com/wp-cumulus-example/tagcloud.swf&quot;, &quot;tagcloud&quot;, &quot;240&quot;, &quot;300&quot;, &quot;7&quot;, &quot;#ffffff&quot;);
// uncomment next line to enable transparency
//so.addParam(&quot;wmode&quot;, &quot;transparent&quot;);
so.addVariable(&quot;tcolor&quot;, &quot;0x333333&quot;);
so.addVariable(&quot;mode&quot;, &quot;tags&quot;);
so.addVariable(&quot;distr&quot;, &quot;true&quot;);
so.addVariable(&quot;tspeed&quot;, &quot;100&quot;);
so.addVariable(&quot;tagcloud&quot;, &quot;<tags><b:loop values='data:labels' var='label'><a expr:href='data:label.url' style='12'><data:label.name/></a></b:loop></tags>&quot;);
so.addParam(&quot;allowScriptAccess&quot;, &quot;always&quot;);
so.write(&quot;flashcontent&quot;);
</script>
<b:include name='quickedit'/>
</div>
</b:includable>
</b:widget></em>


Then preview your template. If installed correctly, you should see the tag cloud appear in your sidebar. Then you are free to save your template, edit the colors and dimensions as required, or move it to a different location. That's all!

Customizing Blogumus

By default, Blogumus includes the following preset variables:

* Width is set to 240px
* Height is set to 300px;
* Background color is white
* Test color is Grey
* Font size is "12"

If you would prefer to make your widget wider, shorter, change the color scheme, etc, you will need to do this by editing various parts of the code. I'll go through these options in the order they appear in the widget code.

1. Editing width and height The variables for width and height are found in this line of the script:

var so = new SWFObject("http://halotemplates.s3.amazonaws.com/wp-cumulus-example/tagcloud.swf", "tagcloud", "240", "300", "7", "#ffffff");


The width (currently 240) is highlighted in red, while the height (300px default) is highlighted in blue. These numerical values specify the width and height in pixels, so you can alter these of you prefer.

2. Editing background color You can change the background color from white to any other color by altering the hex value in the same line:

var so = new SWFObject("http://halotemplates.s3.amazonaws.com/wp-cumulus-example/tagcloud.swf", "tagcloud", "240", "300", "7", "#ffffff");


For a list of HTML Color Number you can check it here


3. Alter the color of text By default, the text is set to display as dark grey ( hex value #333333). You can alter this variable in the following line:

so.addVariable("tcolor", "0x333333");


Be aware that "tcolor" is a Flash variable and doesn't include the usual hash symbol of hex color codes. Be sure to only replace the numbers!

4. Adjust the font size The maximum font size of tags is specified in this line:
so.addVariable("tagcloud", "<tags><b:loop values='data:labels' var='label'><a expr:href='data:label.url' style='12'><data:label.name/></a></b:loop></tags>");


You can alter this to ensure tags are displayed in a bigger or smaller font if you prefer by changing "12" to a larger or smaller number. While making any of these changes, you should be able to preview your widget and be certain that your new choice of color, dimensions and background are suitable for your needs.


Credits to bloggerbuster.com and bloggerstop.net


If you get this ERROR message
"The widget with id Label99 is not within a section (actual parent element is: div.)"


Solution :

First try to remove your labels widget(if you had one)
Second, if the first solution didn't work, try to paste the code outside </b:widget>
like this
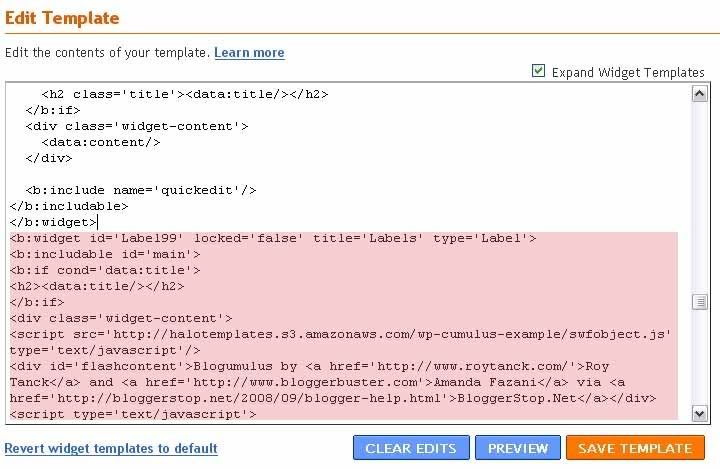

click to enlarge


Copy all the code below </b:widget>
Hopefully that will work... It works 100% with me


Read more...
Monday, February 16, 2009

Firewall Setting to Enable File and Printer Sharing Part 2  

If you have a third party firewall, you can also configure it to allow file and printer sharing. There are several ways to do the settings as a third party firewall usually provide a more complete facility, i.e. allowing network access based on the computers' IP addresses, unblocking network access for certain period of time, defining a set of network environments (e.g. home, office, travel), and defining manually the parameters of a permitted or blocked connection type.

As an example, below is what is done in my Norton Firewall for allowing file and printer sharing within my home network, that's by entering a range of possible dynamic private IP addresses of all computers within my LAN (home network). Entering a range of IP addresses is easier than entering each computer's IP address one by one as it may change at another time. However, you must be careful with the start and end of the range. Refer to your router's DHCP configuration if available, otherwise just set it to the extremes, for instance 192.168.0.1 - 192.168.0.254.


Photobucket


Another method is turning off the firewall for a pre-defined period. This solution is useful for testing which firewall has blocked a network access, but should not be done when your network is connected to the Internet.


Photobucket


Read more...

Firewall Setting to Enable File and Printer Sharing Part 1  

Photobucket
Can a firewall software block file and printer sharing on an ad hoc network? How to configure firewall to allow file and printer sharing in a home network?

Firewall software is designed to control access to/from a computer from/to a network or the Internet. This is done technically by opening and closing certain computer ports only to certain programs or computers. A full blown firewall software will provide protection for both incoming (inbound) and outgoing (outbound) connections and allow its user to customize many of its parameters.

This website provides an extensive list of step-by-step guides to create a direct computer connection or ad hoc network using several connection types, i.e. Ethernet, serial, parallel, Bluetooth, Wi-Fi, USB, IrDA, and FireWire. Readers have reported access problems in such an ad hoc network that can be attributed to the-not-properly-configured firewall software on one or both computers. Many just leave their firewall with its default setting which frequently hinders network access, specifically for file and printer sharing. However, the explanation about firewall configuration in this article also applies to an infrastructure-based network which consists of more than two computers and has a hub, switch, access point, or router to interconnect them.

Below is a Windows error message that pops up when a firewall blocks a network access. You may have noticed once during your network setup.


Photobucket


If you rely only on your Windows Firewall to protect your computer and don't have a third party firewall installed in your PC, the solution is very straightforward. By ticking "File and Printer Sharing" on the "Exceptions" tab, you can access all shared resources on your network provided other computers - in which the shared resources are stored - have been configured to allow file and printer sharing. To make sure that your related computer ports are only open to other computers in your home network, select "File and Printer Sharing", click "Edit". There you can find a list of service names and ports alongside their scopes. The scope can be any computer (including those on the Internet), internal network (those with the same subnet), or custom-defined by each computer IP address.


Photobucket


Read more...
Friday, February 13, 2009

USB not recognized  


Steps to resolve USB Storage Device problem with Vista

1. In the run command (Start menu bar) type "regedit" to bring up the Registry Editor.

2. In Registry Editor, navigate to:

HKEY_LOCAL_MACHINE\Software\Microsoft\Windows\CurrentVersion

3. In the details pane, double-click DevicePath.

4. Add a semi-colon to end of the existing text, and then add the path to %SystemRoot%\System32. The result should be similar to: %SystemRoot%\inf;%SystemRoot%\System32

Do not remove the %SystemRoot%\inf file path from the DevicePath registry entry.

5. Click OK to save the new value, and then close Registry Editor.

6. Delete “INFCACH.1” FROM C:\Windows and C:\Windows\Inf Directories (if it exists)

7. Ensure that there is a copy of the usbstor.inf file in C:\Windows\Inf
If there isn’t – follow the below steps:

a) From another Vista system (copy it out of another Vista system and copy it directly into the C:\Windows\inf directory

OR

b) From the problem machine, run Command Prompt ( as administrator). From C:\ do a dir usbstor.inf /s . Wherever the file is found, go to that directory and copy all the files located in that directory to C:\Windows\inf directory

8. Open device manager, uninstall all unknown devices (right click, uninstall) so they all disappear from the list

9. Reboot the computer

10. Plug the device in (the drivers will now install and the device will be usable!)


Read more...
Thursday, February 12, 2009

How to Repair your XP without Formatting it  


You can easily repair your xp without Uninstalling it. But you need identify your problem is.
1. Repair the Installation
In this case your windows xp has corrupted, and you can logon to the XP.
Preparation:

  • Make sure you have the valid XP key
  • It'll take about 30 or 60 minutes
  • If you're being asked an Administrator Password, you should choose the Second Repair Option, not the first one
Step :
  • Boot from your XP installation CD
  • When you're being asked, choose Repair and press R
  • Press F8 (I Agree at the Licensing Agreement)
  • Press R again. The windows system will check your system
  • After that you will be asked for your key
  • And after that just follow the instructions

2. 'NTOSKRNL' is corrupted or missing
Step:
  • Boot from the CD
  • Press R to Repair it
  • Press a number according to location of the Windows (usually #1)
  • Move to CD-Rom drive in the command (ex: cd h:\)
  • type : "cd i386" (without quote)
  • type : "expand ntkrnlmp.ex_ C:\Windows\System32\ntoskrnl.exe" (without quote)
  • Type exit and take out the CD

3. Corrupted .DLL files
This is caused by corrupted BOOT.INI file
  • Boot from the CD
  • Press R to Repair it
  • Press a number according to location of the Windows (usually #1)
  • type : bootcfg /list
  • type : bootcfg /rebuild
  • Take out the CD, and type exit

4. \WINDOWS\SYSTEM32\CONFIG is corrupted or missing
If you get this message :
"Windows could not start because the following files is missing or corrupt
\WINDOWS\SYSTEM32\CONFIG\SYSTEM or \WINDOWS\SYSTEM32\CONFIG\SOFTWARE"
Solution :
  • Boot from the CD
  • Press R to Repair it
  • Press a number according to location of the Windows (usually #1)
  • type : cd \windows\system32\config
  • type : ren software software.bak OR ren system system.bak
  • type : copy \windows\repair\system
  • type : copy \windows\repair\software
  • type exit and take out the CD

5. NTLDR or NTDETECT.COM Not Found
First to FAT partition
Boot from your windows 98 boot diskette and copy the NTLDR file or NTDETECT.COM

Second to NTFS Partition
  • Boot from the CD
  • Press R to Repair it
  • Press a number according to location of the Windows (usually #1)
  • type : COPY X:\i386\NTLDR C\:
  • type : COPY X:\i386\NTDETECT.COM C:\
  • Assume X is your CD-ROM device
  • take out the CD and type EXIT


Read more...

Best Seller