Search this blog

Home Download Tips Our Stores About

Adbrite

Your Ad Here

Hot Offers


Masukkan Code ini K1-2BE745-X
untuk berbelanja di KutuKutuBuku.com

Visit Our Sponsor

Wednesday, February 25, 2009

USB vs Firewire vs Ethernet : Who wins the race ?  

You may be wondering which external hard drive is the right interface for you, USB, FireWire 400, FireWire 800, eSATA or Ethernet?

I am going to give you a real basic understanding of the different uses for each interface and we're sure you'll know which is right for you when we're done.
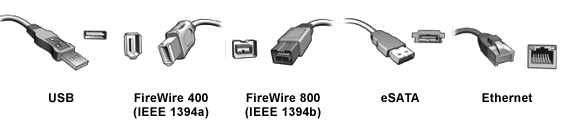
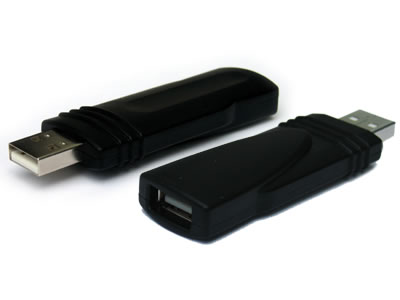


USB 2.0

USB 2.0 is the most widely used interface in the world and works well for the average consumer and even the avid digital collector. USB 2.0 offers relatively fast transfer rates (maximum rate is 480 Mb/s), especially when compared to USB 2.0's distant cousin USB 1.1. USB 2.0 is widely available on desktop, laptop computers and even high-end servers. For most computer users USB 2.0 is the connection of choice for broad compatibility and ease of use. Remember, USB 2.0 is "backwards compatible" to USB 1.1, but your transfer rates will be much slower.


FireWire 400

Also known as IEEE 1394a, FireWire 400 is the friendly arch nemesis of USB 2.0. FireWire 400 (maximum rate is 400 Mb/s) is beneficial for what we call "daisy chaining" external devices. The transfer rate is nearly identical to USB 2.0, but the ability to daisy chain over longer length of cable sets it apart to some extent. FireWire 400 was made popular when Apple started shipping it standard and it has been a choice connection method for Apple users, Video and Audio professionals throughout the years.


FireWire 800

Also known as IEEE 1394b, FireWire 800 is the higher performance version of the FireWire family. The connection is different than a FireWire 400 connection so make sure you have the proper connections on your computer before jumping into a FireWire 800 solution. Going forward more and more systems will have this as standard so buying a solution with this as an option is a good idea. Your transfer rates will double using FW800. You will also have the ability to transfer multiple streams of data over long distances of cable and daisy chain certain devices. FireWire 800 is an excellent option for anyone transferring large amounts of data, such as Audio and Video professionals.


eSATA

The eSATA connection is new and exciting as of the publishing of this article and as we continue to move forward I think we'll be seeing much more of this connection. eSATA is NOT the same connection as an internal SATA cable. You will need a converter or PCI card to enable the use of eSATA on your system, unless it has one built in already. eSATA offers unbelievable transfer speeds (maximum rate 3 Gb/s). Using the eSATA connection is much like plugging directly into your internal hard drive. Check compatibility, but if you are looking for top performance and the latest technology be sure to check into an eSATA solution.


Ethernet


Ethernet or Cat5/Cat6 is a standard method of connecting to a network. All of us plug our computers into our router or model using an Ethernet cable. In a similar fashion an Ethernet enabled external storage device plugs into a router using an Ethernet cable. Gigabit Ethernet (maximum 1000 Mb/s) allows you to transfer data extremely fast if you have a Gigabit capable network. Otherwise you will be forced to use whatever standard your network is running on, be it 100 Mb/s or 10 Mb/s. Either way, this is an excellent way to add NAS (Network Attached Storage) to your home or business infrastructure. You will plug your Ethernet NAS external storage device into your router and access it like a mini storage server. Keep all your music and data in one place and play it from any connected computer system on the network.


so who win the race??
Gigabit ethernet is the fastest. Firewire 800 comes second. Firewire 400 and USB 2.0 is not much different...


Read more...
Tuesday, February 24, 2009

How to change your startup sound  

This tips works in Microsoft Windows XP


Sometimes you must feel bored hearing the same old tunes when you start your PC.
Actually we can change it to any tunes we like. But must using .wav format.


Now I'll tell you the simple steps


  1. Start-ControlPanel-Sound, Speech, and audio devices -> sound and audio devices
  2. Click Sound
  3. In "Program Events" choose "Start Windows"
  4. Click Browse, fine your music and click OK


Don't have a converter? You can use this SITE


Read more...
Wednesday, February 18, 2009

Free Software : Proxy Switcher 3.0  


There are times when you have to cloak your true IP address. It might be that you want to remain anonymous when you visit a particular website. Or your access to various social networking and entertainment sites has been blocked. This will help you.


Proxy Switcher Benefits
* Hide your IP address from the web sites you visit.
* Penetrate bans and blocks on forums, classifields and download sites (rapidshare etc.).
* Automatic proxy server switching for improved anonymous surfing.
* Easy way to change proxy settings on the fly.
* For webmasters - check search engine results from different countries.
* Fully compatible with Internet Explorer, Firefox, Opera and others.
* Advanced proxy list scanning and management.


Read more...

Free Software : Magic Speed 3.0  


Our PC is slow in boot-up and running? Magic Speed will make your PC faster and more efficient in 5 simple steps. The software package includes startup management, fixing registry errors, Disk clean-up, and memory management. It does not require special PC knowledge! Magic Speed will analyze your applications, which are loaded with your PC boot-up. Are you sure that you really need these applications? When loaded, they occupy PC memory and slow down PC operation. A check-up will also include virus and spyware tests thanks to a new anti-virus engine updated on a daily basis.


Read more...

Free Software : BlackMagic 2.8  


Helps you colorize Black & White, Sepia, & IR (infrared) photos BlackMagic Professional Ed. is the ultimate tool for colorizing Black & White, Sepia, or IR (infrared) photos, or for color-correcting/ re-coloring ones with dull, faded, or inappropriate hues. Being extremely simple to use, yet equipped with sophisticated features, it's a software that provides an unprecedented level of productivity for any photo-restoration job requiring colorization or color-corrections.


Read more...

Blogumus : How to Install and Fix the problem  


If you see my labels in the right sidebar.. That's what's called Blogumus tag Cloud. Originally it was made by amanda from bloggerbuster.com. And now I'll tell you how to install it and how to fix any problem.

You can copy paste the code as it is, or change the code before pasting into your blog HTML as per your requirements.
By default the flash widget will be in white background, with gray labels/text, and of dimensions 240x300. And all these can be changed so as to suit your blog's layout and colors.


To start with:
Go to the LAYOUT section, and click on EDIT HTML.
Now find this line/code:

<b:section class='sidebar' id='sidebar' preferred='yes'>


And immediately after this code line, paste these code lines(in new line):

<em><b:widget id='Label99' locked='false' title='Labels' type='Label'>
<b:includable id='main'>
<b:if cond='data:title'>
<h2><data:title/></h2>
</b:if>
<div class='widget-content'>
<script src='http://halotemplates.s3.amazonaws.com/wp-cumulus-example/swfobject.js' type='text/javascript'/>
<div id='flashcontent'>Blogumulus by <a href='http://www.roytanck.com/'>Roy Tanck</a> and <a href='http://www.bloggerbuster.com'>Amanda Fazani</a> via <a href='http://bloggerstop.net/2008/09/blogger-help.html'>BloggerStop.Net</a></div>
<script type='text/javascript'>
var so = new SWFObject(&quot;http://halotemplates.s3.amazonaws.com/wp-cumulus-example/tagcloud.swf&quot;, &quot;tagcloud&quot;, &quot;240&quot;, &quot;300&quot;, &quot;7&quot;, &quot;#ffffff&quot;);
// uncomment next line to enable transparency
//so.addParam(&quot;wmode&quot;, &quot;transparent&quot;);
so.addVariable(&quot;tcolor&quot;, &quot;0x333333&quot;);
so.addVariable(&quot;mode&quot;, &quot;tags&quot;);
so.addVariable(&quot;distr&quot;, &quot;true&quot;);
so.addVariable(&quot;tspeed&quot;, &quot;100&quot;);
so.addVariable(&quot;tagcloud&quot;, &quot;<tags><b:loop values='data:labels' var='label'><a expr:href='data:label.url' style='12'><data:label.name/></a></b:loop></tags>&quot;);
so.addParam(&quot;allowScriptAccess&quot;, &quot;always&quot;);
so.write(&quot;flashcontent&quot;);
</script>
<b:include name='quickedit'/>
</div>
</b:includable>
</b:widget></em>


Then preview your template. If installed correctly, you should see the tag cloud appear in your sidebar. Then you are free to save your template, edit the colors and dimensions as required, or move it to a different location. That's all!

Customizing Blogumus

By default, Blogumus includes the following preset variables:

* Width is set to 240px
* Height is set to 300px;
* Background color is white
* Test color is Grey
* Font size is "12"

If you would prefer to make your widget wider, shorter, change the color scheme, etc, you will need to do this by editing various parts of the code. I'll go through these options in the order they appear in the widget code.

1. Editing width and height The variables for width and height are found in this line of the script:

var so = new SWFObject("http://halotemplates.s3.amazonaws.com/wp-cumulus-example/tagcloud.swf", "tagcloud", "240", "300", "7", "#ffffff");


The width (currently 240) is highlighted in red, while the height (300px default) is highlighted in blue. These numerical values specify the width and height in pixels, so you can alter these of you prefer.

2. Editing background color You can change the background color from white to any other color by altering the hex value in the same line:

var so = new SWFObject("http://halotemplates.s3.amazonaws.com/wp-cumulus-example/tagcloud.swf", "tagcloud", "240", "300", "7", "#ffffff");


For a list of HTML Color Number you can check it here


3. Alter the color of text By default, the text is set to display as dark grey ( hex value #333333). You can alter this variable in the following line:

so.addVariable("tcolor", "0x333333");


Be aware that "tcolor" is a Flash variable and doesn't include the usual hash symbol of hex color codes. Be sure to only replace the numbers!

4. Adjust the font size The maximum font size of tags is specified in this line:
so.addVariable("tagcloud", "<tags><b:loop values='data:labels' var='label'><a expr:href='data:label.url' style='12'><data:label.name/></a></b:loop></tags>");


You can alter this to ensure tags are displayed in a bigger or smaller font if you prefer by changing "12" to a larger or smaller number. While making any of these changes, you should be able to preview your widget and be certain that your new choice of color, dimensions and background are suitable for your needs.


Credits to bloggerbuster.com and bloggerstop.net


If you get this ERROR message
"The widget with id Label99 is not within a section (actual parent element is: div.)"


Solution :

First try to remove your labels widget(if you had one)
Second, if the first solution didn't work, try to paste the code outside </b:widget>
like this


click to enlarge


Copy all the code below </b:widget>
Hopefully that will work... It works 100% with me


Read more...
Tuesday, February 17, 2009

Free Software : Easy Wi-fi Radar  

Must have for Notebook Users..


Some things in life should be free. Easy WiFi Radar helps you find and connect to open wireless access points with a single mouseclick. It's WiFi for Dummies. And we're giving it away.

If you have ever tried to use Windows XP's built-in connection manager, you know what a hassle it can be to quickly check your mail or browse the web on the go. You need to browse through a list of access points, find one that you can connect to, manually try to connect to it, confirm the connection and then wait. Even if it says that's it connected, often it doesn't open a webpage or you mail will stall. Easy WiFi Radar automates all of this. It's main goal is to let you get your mail or surf the web without having to go through all of the connection trouble, and without having to pull your creditcard. Just run it and it'll connect you for FREE to the internet. It doesn't get easier than this.

Get your mail and browse the web without being charged. The ideal WiFi-tool for frequent travellers and mobile professionals. Easy WiFi Radar will connect to open hotspots automatically and shows you exactly what it is doing in a cool animated radar screen. Access points are represented as green, yellow or red dots. It plays a sound and opens your webbrowser as soons as it succesfully finds a free connection.


Grab it HERE....


Read more...

Free Software : FaceSwapper 1.0.0.0  

Easy to use... Swap whoever face you like..


FaceSwapper makes it easy to cut and paste faces from one picture into another without precision selections or manual color adjustments. The cutting and pasting occurs in 3D space, allowing you to easily match the angle and direction of the target face. No need to use complicated 3D modeling applications or expensive graphical packages. Create high-quality collages in just minutes!Create perfectly looking collages and win photoshopping contests with FaceSwapper! The innovative tool makes it easy to swap faces between images.

FaceSwapper takes care of everything from detecting and selecting faces in both the original and target images to adjusting colors, gamma and angle of the face to make it blend seamlessly with the destination background. Automatic Face Selection No lengthy manual selections and no complicated color adjustments are required – just click the two faces with a mouse, and FaceSwapper will create a smooth, natural-looking collage right away! Jagged-Free Edges The automatic face detection and selection tool ensures jagged-free selection of the original face, which makes the source and target faces blend seamlessly to produce smooth, natural images. Automatic Color Adjustment No two pictures are exactly alike.


Grab it HERE...


Read more...

Free Software : ASCII Art Generator  


What makes ASCGEN different from other Image to ASCII converters is
that it gives you lot of control over the output text - you can change
the output dimensions, flip sides or adjust the brightness and contrast
levels of the output text image through sliders in real time.


Download here (RS)..


Read more...

Free Software : Tune Up Utilities 2009  

Must HAVE software in your PC!!


* Intelligently detects your system’s potential for optimization
* Recognizes underutilized programs and reduces performance-draining tasks
* Makes optimizing your computer’s performance easier than ever

* Improve load times for your operating system, games and other programs
* Speed up overall Windows PC response time and performance
* Maintain an organized hard drive


* Reduces complex and resource-draining programs that launch during the start-up of your PC
* Identifies hidden programs in your start-up folder and removes them
* Identifies common programs and gives recommendation on enhancing their performance

* dentifies and repairs structural defects present in your registry
* Reduces fragments in your PC’s registry
* Frees unused memory being monopolized by your registry
* Increases overall system performance through intelligent, automatic


Download HERE...


Read more...

Free E-Book : O'Reilly 802.11 Wireless Networks: The Definitive Guide  

802.11 Wireless Networks: The Definitive Guide


Description


If you want to deploy your own wireless network--at home or at the office you must first understand the capabilities and risks associated with the 802.11 protocols. And 802.11 Wireless Networks: The Definitive Guide, 2nd Edition is the perfect place to start. This updated edition covers everything you need to know about integrating wireless technology into your current infrastructure.


Read it MORE...


Read more...

Free E-Book : PC Gamer Magazine  

PC Gamer Magazine Jan 2009


Read it HERE...


Read more...

Free E-Book : The PC Secret (RARE)  

The PC Secret


From the Author: The best $37 you have ever spent towards your PC. What you’re reading is worth way over $37 and the primary reason I offer it to everyone at this ridiculous price is because I know how frustrating a slow PC can be (I too was ONCE there.) From now on I really hope you never call a computer man again, those people are a joke, they charge over $250 an hour to do BASIC things like clean your PC or Defragment your HDD and they call that a “complete PC wash”. You’ve just got robbed.


Prepare to be over delivered with information never before seen in an eBook. My name is Kris Mainieri, and for 7 years I have been fixing and optimizing computer part time for extra cash. I have done jobs for many big companies and most of the cyber cafes in my area. I am going to reveal information in here that 99% of you haven’t seen before. I’m not talking about the essentials like Defragmenting and Cleanups but hardcore Internet and registry tweaks and more.

Download HERE (RS)


Read more...

Free E-Book : 101 Microsoft Visual Basic .NET Applications  

101 Microsoft Visual Basic .NET Applications


Description

Author(s): Sean Campbell, Scott Swigart, Bob Carver
Publisher: MS Press
Year: 2003
ISBN: 0735618917
Language: English
File type: CHM
Pages: 561
Size (for download): 9.2 MB


The 101 sample applications that make up this book contain code that answers many common questions a beginner-to-intermediate-level Microsoft Visual Basic .NET developer is faced with when building Microsoft .NET applications.

Each sample application was developed using a set of coding conventions (which you’ll find in this book), and each sample shares a common look and feel, as much as possible. Each sample also includes a readme.htm file that explains some basics of the application in case you’re reviewing a sample without having the book close at hand.


The samples in this book are ready to be run in either the Microsoft Visual Studio .NET 2002 or 2003 development environment. You can find the Visual Studio .NET 2003 files in Chapter folders within the \101VBApps folder; look inside the VS2002 folder within the \101VBApps folder for the Visual Studio .NET 2002 files.

Finally each application is designed to be “F5-able,” meaning that they should all run out of the box, without any special configuration. Any circumstances for which specific software or setup is needed is fully documented in the readme. The only general requirement is that you have Microsoft SQL Server installed either as a default instance or an instance installed with the name NETSDK. You can easily install a version of SQL Server by installing the version of MSDE that ships with the .NET Framework quickstarts.

Explore 101 of the most useful Visual Basic .NET applications in action—and jumpstart your own Microsoft .NET Framework-based development projects. This guide provides expert, behind-the-code commentary on 101 fully executable code samples—distilling more than 700 hours of programming time into best practices for Microsoft Windows Forms development. Each code sample demonstrates core features and functions of Visual Basic .NET and the .NET Framework, explains the underlying programming concepts, and provides a complete code walkthrough. From creating basic data entry forms to drilling deep into the .NET Framework, you’ll learn the techniques that Microsoft’s own developers use to write real-world applications with Visual Basic .NET.


TABLE OF CONTENT:
Chapter 01 - Working with Microsoft Visual Studio .NET 2003 and Microsoft .NET Framework 1.1
Chapter 02 - Working with the Microsoft Visual Basic .NET Language
Chapter 03 - Data Access
Chapter 04 - Building Windows Forms User Interfaces
Chapter 05 - Building Web Applications
Chapter 06 - Working with Console Applications
Chapter 07 - Interacting with the Operating System
Chapter 08 - Working with the .NET Framework
Chapter 09 - Advanced .NET Framework
Chapter 10 - GDI+
Chapter 11 - Building Enterprise Services Applications
Chapter 12 - COM Interop/PInvoke
Chapter 13 - Visual Studio .NET
Chapter 14 - Securing Applications
Chapter 15 - Coding Conventions
Chapter 16 - Windows Server 2003 for .NET Developers


Size: 9442KB
Download HERE...


Read more...

Free Software : FileMaker Server  

FileMaker Server v10.0.1 Advanced


FileMaker Pro is the #1-selling easy-to-use database software for Windows that helps you manage people, projects, assets and more the easy way!
How did FileMaker Pro get to be the world’s leading easy-to-use database application? For one simple reason – it helps anyone with any type of task get things done faster. And it doesn’t matter if you’re a Mac or Windows user – you can create and share information with each other through a network, over the web, or in popular formats such as PDF. Millions of people just like you rely on FileMaker Pro every day to effortlessly manage and share their information.


FileMaker Server 10 is the fast, reliable, easy-to-manage database server software for groups of FileMaker Pro users that lets you securely share your databases over a network or on the web.

Simply install FileMaker Server 10 on a dedicated computer and upload your FileMaker Pro solutions to the server. Installation and configuration takes just 20 minutes or less. You'll be able to securely manage your databases from anywhere, schedule live backups and get 24/7 availability.

FileMaker Server 10 Advanced includes all the features in FileMaker Server 10 plus Instant Web Publishing capabilities, ODBC/JDBC connectivity, and higher FileMaker Pro connection limits. Whether over a network or on the web, FileMaker Server 10 Advanced maximizes your database sharing and connectivity capabilities, easily and securely.

NEW! Get More Simultaneous User Connections

If you need to connect larger groups of FileMaker Pro users, only FileMaker Server 10 Advanced supports up to 999 FileMaker Pro users at the same time – 4x more users than FileMaker Server 10.
Share with More Users via Instant Web Publishing

Use Instant Web Publishing to easily publish databases over the web to share with large groups of people. You can start securely sharing any type of information in just a couple of clicks. Publish registration sites, customer feedback forms, service requests, surveys, and more. Instant Web Publishing requires no special hardware or software and supports popular web browsers.


Share FileMaker Pro Data via ODBC/JDBC

ODBC (Open Database Connectivity) and JDBC (Java Database Connectivity) support makes it possible to read from and write to FileMaker Pro databases hosted by FileMaker Server 10 Advanced with a variety of external programs and development tools. Get up to 50 simultaneous ODBC/JDBC remote connections. These connections can be established by programs running on the local server or from programs running on remote clients.

Easily share your FileMaker data with any ODBC/JDBC compliant application:

* Pull FileMaker data into a web application built with industry-standard web development tools such as Ruby on Rails, javascript or Microsoft .NET Framework.
* Integrate your FileMaker data with custom applications built on leading platforms such as Oracle, SAP or Microsoft SQL.


Grab it HERE (RS)


Read more...

Free Software : Winmount  

Winmount 3.1.1201[portable]
What's mount?
It refers to creating a virtual drive or folder for files. Mount is a new conception, it provides a revolutionary way to use compressed archives. Files can be directly used by mounting it to a virtual drive or a local folder.


Size : ±2.4Mb | Pass : jelounge
Download Here ( IIX only )


Read more...
Monday, February 16, 2009

Firewall Setting to Enable File and Printer Sharing Part 2  

If you have a third party firewall, you can also configure it to allow file and printer sharing. There are several ways to do the settings as a third party firewall usually provide a more complete facility, i.e. allowing network access based on the computers' IP addresses, unblocking network access for certain period of time, defining a set of network environments (e.g. home, office, travel), and defining manually the parameters of a permitted or blocked connection type.

As an example, below is what is done in my Norton Firewall for allowing file and printer sharing within my home network, that's by entering a range of possible dynamic private IP addresses of all computers within my LAN (home network). Entering a range of IP addresses is easier than entering each computer's IP address one by one as it may change at another time. However, you must be careful with the start and end of the range. Refer to your router's DHCP configuration if available, otherwise just set it to the extremes, for instance 192.168.0.1 - 192.168.0.254.


Photobucket


Another method is turning off the firewall for a pre-defined period. This solution is useful for testing which firewall has blocked a network access, but should not be done when your network is connected to the Internet.


Photobucket


Read more...

Firewall Setting to Enable File and Printer Sharing Part 1  

Photobucket
Can a firewall software block file and printer sharing on an ad hoc network? How to configure firewall to allow file and printer sharing in a home network?

Firewall software is designed to control access to/from a computer from/to a network or the Internet. This is done technically by opening and closing certain computer ports only to certain programs or computers. A full blown firewall software will provide protection for both incoming (inbound) and outgoing (outbound) connections and allow its user to customize many of its parameters.

This website provides an extensive list of step-by-step guides to create a direct computer connection or ad hoc network using several connection types, i.e. Ethernet, serial, parallel, Bluetooth, Wi-Fi, USB, IrDA, and FireWire. Readers have reported access problems in such an ad hoc network that can be attributed to the-not-properly-configured firewall software on one or both computers. Many just leave their firewall with its default setting which frequently hinders network access, specifically for file and printer sharing. However, the explanation about firewall configuration in this article also applies to an infrastructure-based network which consists of more than two computers and has a hub, switch, access point, or router to interconnect them.

Below is a Windows error message that pops up when a firewall blocks a network access. You may have noticed once during your network setup.


Photobucket


If you rely only on your Windows Firewall to protect your computer and don't have a third party firewall installed in your PC, the solution is very straightforward. By ticking "File and Printer Sharing" on the "Exceptions" tab, you can access all shared resources on your network provided other computers - in which the shared resources are stored - have been configured to allow file and printer sharing. To make sure that your related computer ports are only open to other computers in your home network, select "File and Printer Sharing", click "Edit". There you can find a list of service names and ports alongside their scopes. The scope can be any computer (including those on the Internet), internal network (those with the same subnet), or custom-defined by each computer IP address.


Photobucket


Read more...
Friday, February 13, 2009

USB not recognized  


Steps to resolve USB Storage Device problem with Vista

1. In the run command (Start menu bar) type "regedit" to bring up the Registry Editor.

2. In Registry Editor, navigate to:

HKEY_LOCAL_MACHINE\Software\Microsoft\Windows\CurrentVersion

3. In the details pane, double-click DevicePath.

4. Add a semi-colon to end of the existing text, and then add the path to %SystemRoot%\System32. The result should be similar to: %SystemRoot%\inf;%SystemRoot%\System32

Do not remove the %SystemRoot%\inf file path from the DevicePath registry entry.

5. Click OK to save the new value, and then close Registry Editor.

6. Delete “INFCACH.1” FROM C:\Windows and C:\Windows\Inf Directories (if it exists)

7. Ensure that there is a copy of the usbstor.inf file in C:\Windows\Inf
If there isn’t – follow the below steps:

a) From another Vista system (copy it out of another Vista system and copy it directly into the C:\Windows\inf directory

OR

b) From the problem machine, run Command Prompt ( as administrator). From C:\ do a dir usbstor.inf /s . Wherever the file is found, go to that directory and copy all the files located in that directory to C:\Windows\inf directory

8. Open device manager, uninstall all unknown devices (right click, uninstall) so they all disappear from the list

9. Reboot the computer

10. Plug the device in (the drivers will now install and the device will be usable!)


Read more...
Thursday, February 12, 2009

How to Repair your XP without Formatting it  


You can easily repair your xp without Uninstalling it. But you need identify your problem is.
1. Repair the Installation
In this case your windows xp has corrupted, and you can logon to the XP.
Preparation:

  • Make sure you have the valid XP key
  • It'll take about 30 or 60 minutes
  • If you're being asked an Administrator Password, you should choose the Second Repair Option, not the first one
Step :
  • Boot from your XP installation CD
  • When you're being asked, choose Repair and press R
  • Press F8 (I Agree at the Licensing Agreement)
  • Press R again. The windows system will check your system
  • After that you will be asked for your key
  • And after that just follow the instructions

2. 'NTOSKRNL' is corrupted or missing
Step:
  • Boot from the CD
  • Press R to Repair it
  • Press a number according to location of the Windows (usually #1)
  • Move to CD-Rom drive in the command (ex: cd h:\)
  • type : "cd i386" (without quote)
  • type : "expand ntkrnlmp.ex_ C:\Windows\System32\ntoskrnl.exe" (without quote)
  • Type exit and take out the CD

3. Corrupted .DLL files
This is caused by corrupted BOOT.INI file
  • Boot from the CD
  • Press R to Repair it
  • Press a number according to location of the Windows (usually #1)
  • type : bootcfg /list
  • type : bootcfg /rebuild
  • Take out the CD, and type exit

4. \WINDOWS\SYSTEM32\CONFIG is corrupted or missing
If you get this message :
"Windows could not start because the following files is missing or corrupt
\WINDOWS\SYSTEM32\CONFIG\SYSTEM or \WINDOWS\SYSTEM32\CONFIG\SOFTWARE"
Solution :
  • Boot from the CD
  • Press R to Repair it
  • Press a number according to location of the Windows (usually #1)
  • type : cd \windows\system32\config
  • type : ren software software.bak OR ren system system.bak
  • type : copy \windows\repair\system
  • type : copy \windows\repair\software
  • type exit and take out the CD

5. NTLDR or NTDETECT.COM Not Found
First to FAT partition
Boot from your windows 98 boot diskette and copy the NTLDR file or NTDETECT.COM

Second to NTFS Partition
  • Boot from the CD
  • Press R to Repair it
  • Press a number according to location of the Windows (usually #1)
  • type : COPY X:\i386\NTLDR C\:
  • type : COPY X:\i386\NTDETECT.COM C:\
  • Assume X is your CD-ROM device
  • take out the CD and type EXIT


Read more...

Generic Host Process for Win32 Services has encountered a problem  

Do you seeeing this problem lately?


Now Here's a solution to you..
This error message points to 2 system file ; "netapi32.dll" and "svchost.exe"
First you need to close port 445 and 135, how?
  • Start-Run-regedit and find this key : HKEY_LOCAL_MACHINE\System\CurrentControlSet\Servic es\NetBT\Parameters and find key named "TransportBindName", double click on to it, then empty the value (blank)
  • Then find HKEY_LOCAL_MACHINE\Software\Microsoft\OLE, find string "EnableDCOM" set the value to N (the default is Y).
Second, Simply Update and patch your windows from Microsoft Official's site


Warning... This error might be caused by virus. So you better use the appropriate anti-virus


Read more...
Tuesday, February 10, 2009

SSH tunneling : Gateway to faster Internet Access  

There are plenty ways to faster internet. And know I'm going to discuss the SSH Tunneling Technique. What the hell is that??


Tunneling, or port forwarding, is a way to forward otherwise insecure TCP traffic through SSH Secure Shell for Workstations. You can secure for example POP3, SMTP and HTTP connections that would otherwise be insecure


The tunneling capability of SSH Secure Shell for Workstations is a feature that allws, for example, company employees to access their email, company intraweb pages and shared files securely by even when working from home or on the road.

Tunneling makes it possible to access email from any type of Internet service (whether accessed via modem, a DSL line or a cable connection, or a hotel Internet service). As long as the user has an IP connection to the Internet she can get her mail and access other resources from anywhere in the world securely.

This often is not the case with more traditional IPSec based VPN technologies because of issues with traversing networks that are implementing Network Address Translation (NAT) - this is especially the case in hotels. NAT breaks an IPSec connection unless special protocols such as NAT-Traversal are implemented on the client and gateway.

The client-server applications using the tunnel will carry out their own authentication procedures, if any, the same way they would without the encrypted tunnel.

The protocol/application might only be able to connect to a fixed port number ( e.g. IMAP 143). Otherwise any available port can be chosen for port forwarding.

Tunneling settings are configured using the Tunneling page of the Settings dialog.


And here's from wikipedia

SSH tunneling

An SSH tunnel is an encrypted tunnel created through an SSH protocol connection. SSH tunnels may be used to tunnel unencrypted traffic over a network through an encrypted channel. For example, Windows machines can share files using the SMB protocol, which is not encrypted. If you were to mount a Windows filesystem remotely through the Internet, someone snooping on the connection could see your files. To mount the Windows filesystem securely, you can establish an SSH tunnel that routes all SMB traffic to the remote fileserver through an encrypted channel. Even though the SMB protocol itself is unencrypted it is secure because it travels through the encrypted SSH channel.

To create an SSH tunnel, an SSH client is configured to forward a specified local port to a port on the remote machine. Once the SSH tunnel has been established, the user can connect to the specified local port to access the network service. The local port need not be the same as the remote port.

SSH tunnels provide a means to bypass firewalls that prohibit certain Internet services provided that outgoing connections are allowed. For example, an organization may prohibit a user from accessing Internet web pages (port 80) directly without passing through the organization's proxy filter which provides the organization a means of monitoring and controlling what the user sees through the web. The user may not wish to have their web traffic monitored or blocked by the organization's proxy filter. If a user is able to connect to an external SSH server, it is possible for them to create an SSH tunnel to forward a given port on their local machine to port 80 on a remote web server. To access the remote web server the user would point their browser to http://localhost/.

Some SSH clients support dynamic port forwarding that allows the user to create a SOCKS 4/5 proxy. The user can configure his/her applications to use their local SOCKS proxy server. This is more flexible than creating an SSH tunnel to a single port as previously described. With SOCKS the user is not limited to connecting only to a predefined remote port and server.

Enough the theory.. Now it's time to try.


For Windows User
First You need an SSH Application Software.. You can use Putty..
This is an open source software. You're free to download from here.

Second, Move the Putty.exe file to c:\Windows

Third, Start->Run->type "putty -P 22 -N -D 9999 -C username@IP"
Without quote
You can use net as username with IP : cepat.abangadek.com

and 123 as password.

You can use other SSH server that offers free service. I'll tell you more later.

Fourth,
For Internet Explorer
  • Open Internet Explorer,
  • Tools->Options
  • Click Connection tab
  • Click LAN Settings
  • Enable "use a proxy server" and Click Advanced
  • In the Socks Column fill : localhost, with port 9999
  • In the Exception Column("Do not use proxy server for address beginning with") fill with : 127.0.0.1;192.168.1.1/16
  • Click Ok and close the dialog box
  • Refresh the Internet Explorer. And you are free to go

For Mozilla Firefox
  • Open it
  • Edit-Preferences
  • Click Advanced
  • Choose Network tab
  • Click Settings
  • Choose Manual Proxy Configuration
  • In the Socks Column fill : localhost, with port 9999
  • In the Exception Column("Do not use proxy server for address beginning with") fill with : 127.0.0.1;192.168.1.1/16


For Linux User
Simply open the terminal or konsole
type : "ssh -o "CompressionLevel=9" -C -D 9999 -p 22 -N username@IP"
(without quote)
You can use net as username with IP : cepat.abangadek.com
and 123 as password.

And change the Browser Setting
For Mozilla Firefox
  • Open it
  • Edit-Preferences
  • Click Advanced
  • Choose Network tab
  • Click Settings
  • Choose Manual Proxy Configuration
  • In the Socks Column fill : localhost, with port 9999
  • In the Exception Column("Do not use proxy server for address beginning with") fill with : 127.0.0.1;192.168.1.1/16


This is the list of other free SSH Services :
demo.fatjackhosting.com --> user : demofat | password : fatjack
cepat.abangadek.com:222 --> user : net | password : cepat123
cpdemo.lanehost.com --> user : cplane | password : cppass
cpanel.superbighosting.com --> user : demo | password : cpanel
www.mitrahosting.net --> user : democp | password : cpanel
cpaneldemo.leveltenhosting.com --> user : cplevel | password : cppass
iix.duoserversindonesia.com --> user : demoacc | password : demo
67.228.90.200 --> user : democom | password : 1234


Read more...
Saturday, February 7, 2009

Set up a wireless network without a router  

Wireless networks are helpful because they let you use your computer and connect to the Internet anywhere in your home or office. However, most wireless networks use a wireless router, which can be expensive. If you have more than one computer, you can set up a wireless network without buying a wireless router and save yourself some money.

In a traditional wireless network, a wireless router acts as a base station, much like the base station for cordless phones. All wireless communications go through the wireless router, allowing nearby computers to connect to the Internet or to each other.


Photobucket

Ad hoc wireless networks work more like walkie-talkies, because the computers communicate directly with each other. By enabling ICS or Internet Connection Sharing on one of the computers, you can share Internet access.

Photobucket
Ad hoc networking might seem like a much smarter alternative to using a wireless router, but it does have a couple of disadvantages:
• If the computer connected to the Internet is shut down, all computers that are part of the ad hoc network lose their Internet access.
• To connect to the Internet, one computer always needs a wired network connection.

To connect your computers to the Internet using an ad hoc wireless network, follow these high-level steps (described in more detail later in this article):

1.Enable Internet Connection Sharing on the Internet-connected computer.
Enable Internet Connection Sharing on the Internet-connected computer. You can skip this step if you don't need to access the Web.

2.Set up the ad hoc wireless network on the Internet-connected computer.
Set up the ad hoc wireless network on the Internet-connected computer.

3.Add your other computers to the wireless network.
Add your other computers to the wireless network.
Type rest of the post here


How to enable Internet Connection Sharing

On networks with wireless routers, the router has the important job of forwarding communications from the computers on your home network to the Internet. On ad hoc networks, you must designate one computer to serve this role. The computer you choose must have a wired connection to the Internet, and it should be left on whenever you want to be able to use your other computers.

How to set up the first computer

To set up an ad hoc wireless network that allows computers to share an Internet connection without a router

1.If necessary, install a wireless network adapter.

2.Click Start, and then click Control Panel.

3.Under Pick a category, click Network and Internet Connections.

4.Under or pick a Control Panel icon, click Network Connections.

5.Right-click your wireless network connection, and then click Properties.

6.In the Wireless Network Connection Properties dialog box, click the Wireless Networks tab.

7.On the Wireless Networks tab, under Preferred networks, click Add.

8.In the Wireless network properties dialog box, on the Association tab, type the name of your ad hoc wireless network in Network name (SSID) box (shown in step 10). For example, you could name your wireless network MyHomeNetwork.

9.Clear the The key is provided for me automatically check box and select the This is a computer-to-computer (ad hoc) network check box.

10.Create a 13-digit password and type it in both the Network key and Confirm network key boxes. For the best security, include letters, numbers, and punctuation. Then click OK.

11.Click OK again to save your changes.


How to set up additional computers

If the computer you want to add to your network does not have built-in wireless network support, install a wireless network adapter.

Windows XP automatically detects the new adapter and notifies you that it found a wireless network.

Now connect your computer to your wireless network

Note: These steps apply only if you're using Windows XP Service Pack 2 (SP2). If you haven't installed SP2, visit Microsoft Update to install it before connecting to the ad hoc network.

1.Right-click the Wireless Network icon in the lower right corner of your screen, and then click View Available Wireless Networks.

2.The Wireless Network Connection window appears and displays your wireless network listed with the SSID you chose. If you don't see your network, click Refresh Network List in the upper left corner. Click your network, and then click Connect in the lower right corner.

3.Windows XP prompts you to enter a key. Type your encryption key in both the Network key and Confirm network key boxes, and then click Connect.

Windows XP shows its progress as it connects to your network. After you're connected, you can close the Wireless Network Connection window.


Repeat these three steps on each computer that you want to connect to your ad hoc wireless network.

Now you're ready to browse the Web wirelessly, from any computer you add to your home network.


Read more...

Movie Code  


Feeling confused about Movie Code and Screen Quality??
Now I tell you all about these movie code

CAM -
A cam is a theater rip usually done with a digital video camera. A mini tripod is sometimes used, but a lot of the time this wont be possible, so the camera make shake. Also seating placement isn't always idle, and it might be filmed from an angle. If cropped properly, this is hard to tell unless there's text on the screen, but a lot of times these are left with triangular borders on the top and bottom of the screen. Sound is taken from the onboard microphone of the camera, and especially in comedies, laughter can often be heard during the film. Due to these factors picture and sound quality are usually quite poor, but sometimes we're lucky, and the theater will be fairly empty and a fairly clear signal will be heard.

TELESYNC (TS) -
A telesync is the same spec as a CAM except it uses an external audio source (most likely an audio jack in the chair for hard of hearing people). A direct audio source does not ensure a good quality audio source, as a lot of background noise can interfere. A lot of the times a telesync is filmed in an empty cinema or from the projection booth with a professional camera, giving a better picture quality. Quality ranges drastically, check the sample before downloading the full release. A high percentage of Telesyncs are CAMs that have been mislabeled.

Type rest of the post here

TELECINE (TC) -
A telecine machine copies the film digitally from the reels. Sound and picture should be very good, but due to the equipment involved and cost telecines are fairly uncommon. Generally the film will be in correct aspect ratio, although 4:3 telecines have existed. TC should not be confused with TimeCode , which is a visible counter on screen throughout the film.

SCREENER (SCR) -
A pre VHS tape, sent to rental stores, and various other places for promotional use. A screener is supplied on a VHS tape, and is usually in a 4:3 (full screen) a/r, although letterboxed screeners are sometimes found. The main draw back is a "ticker" (a message that scrolls past at the bottom of the screen, with the copyright and anti-copy telephone number). Also, if the tape contains any serial numbers, or any other markings that could lead to the source of the tape, these will have to be blocked, usually with a black mark over the section. This is sometimes only for a few seconds, but unfortunately on some copies this will last for the entire film, and some can be quite big. Depending on the equipment used, screener quality can range from excellent if done from a MASTER copy, to very poor if done on an old VHS recorder thru poor capture equipment on a copied tape. Most screeners are transferred to VCD, but a few attempts at SVCD have occurred, some looking better than others.

DVD-SCREENER (DVDscr) -
Same premise as a screener, but transferred off a DVD. Usually letterbox , but without the extras that a DVD retail would contain. The ticker is not usually in the black bars, and will disrupt the viewing. If the ripper has any skill, a DVDscr should be very good. Usually transferred to SVCD or DivX/XviD.


DVDRip -
A copy of the final released DVD. If possible this is released PRE retail again, should be excellent quality. DVDrips are released in SVCD and DivX/XviD.

High-definition (HD):
High-definition (HD) video generally refers to any video system of higher resolution than standard-definition (SD) video, most commonly at display resolutions of 1280×720 (720p) or 1920×1080 (1080i or 1080p). This article discusses the general concepts of high-definition video, as opposed to its specific applications in television broadcast (HDTV), video recording formats (HDCAM, HDCAM-SR, DVCPRO HD, D5 HD, XDCAM HD, HDV and AVCHD), the optical disc delivery system Blu-ray Disc and the video tape format D-VHS.
A common resolution used in HD Ready LCD TV panels is 1366 × 768 pixels instead of the ATSC Standard 1280 × 720 pixels. This is due to maximization of manufacturing yield and resolution of VGA, VRAM that comes with a 768 pixel format. Hence, LCD manufacturers adopt the 16:9 ratio compatible for the HD Ready 1080p standard. Nevertheless, every HDTV has an overscan processing chipset to fix resolution scaling and color rendering, e.g. LG XD Engine, Sony BRAVIA Engine. Only when viewing 1080i/1080p HD contents under HD Ready 1080p where there is true pixel-for-pixel reproduction, and for HD ready LCD TV, do some signals undergo a scaling process which results in a 3-5% loss of picture. Most HD-ready CRT TVs use 1080i resolution.
(Source : Wikipedia)


Read more...
Friday, February 6, 2009

I've got a shocking Error on My XP  


A few months ago. I had a shocking problems with my XP. In the morning it seemed fine. Then I turned it off, and In the day I got back from my college and turn my laptop on. And I got this error message "a problem is preventing Windows from accurately checking the licence ErrorCode0x80004005."

click to enlarge

FYI I used Windows XP SP2 with SP3 patches.
Then I search all the solutions on the internet.. And here's what I got

.

.
Solution NO 1

Open your computer in safe mode,

open a command promt


Register the following DLL s

it should be in the %system root% \ system32 folder

just type the following statements one by one and see you got success information popup


regsvr32 licwmi.dll

regsvr32 regwizc.dll

regsvr32 licdll.dll

regsvr32 jscript.dll

regsvr32 vbscript.dll

regsvr32 msxml.dll

regsvr32 shdocvw.dll

regsvr32 softpub.dll

regsvr32 wintrust.dll

regsvr32 initpki.dll

regsvr32 dssenh.dll

regsvr32 rsaenh.dll

regsvr32 gpkcsp.dll

regsvr32 sccbase.dll

regsvr32 slbcsp.dll

regsvr32 cryptdlg.dll


then try to restart,
Well it didn't work for me. Let's try another one.


N0 2

1. Start the computer. Press the F8 key during startup to start the computer in Safe mode.
2. Start Registry Editor (Regedt32.exe).
3. Delete the following registry keys in the Windows registry:
HKEY_USERS\.DEFAULT\Software\Microsoft\Cryptography\Providers
HKEY_USERS\S-1-5-20\Software\Microsoft\Cryptography\Providers
4. Quit Registry Editor.
5. Restart the computer.

It also didn't work...


No 3
Start/run regsvr32 regwizc.dll
Then start/run regsvr32 licdll.dll

If this doesn't help try these steps:

Start the computer in Safe mode by hitting F8 at bootup. Start/run regedit.
Delete the following keys:

HKEY_USERS\.DEFAULT\Software\Microsoft\Cryptography\Providers
HKEY_USERS\S-1-5-20\Software\Microsoft\Cryptography\Providers

Exit the registry editor, restart normally.

It didn't work too... Oh my God..


No4

Then I decided too look for official Help and Support at microsoft's sites.. And here's what I got
Workaround for error code 0x80004005
To work around this problem, use one of the following methods.
Method 1
Note You should follow this method if this error code occurs after you upgrade from Microsoft Windows 98 Second Edition.

Start from the Windows XP CD-ROM, and then perform an in-place upgrade repair. Make sure that you use a valid product key. For more information about performing an in-place upgrade, click the following article number to view the article in the Microsoft Knowledge Base:
315341 (http://support.microsoft.com/kb/315341/ ) How to perform an in-place upgrade (reinstallation) of Windows XP
You can also resolve this problem by uninstalling Windows XP. Then, reinstall the operating system that you were running before you upgraded to Windows XP. For more information about how to uninstall Windows XP, click the following article number to view the article in the Microsoft Knowledge Base:
312569 (http://support.microsoft.com/kb/312569/ ) How to manually start the uninstall process to remove Windows XP
Method 2
To resolve the problem, repair the installation of Windows XP by using the Windows XP CD, and then replace the files. To do this, follow these steps:

1. Insert the Windows XP CD in the CD drive or in the DVD drive.
2. Restart your computer.
3. When you receive the following message, press a key to start your computer from the Windows XP CD:
Press any key to start from CD
Note Your computer must be configured to start from the CD drive or from the DVD drive. For more information about how to configure your computer to start from the CD drive or from the DVD drive, see the documentation that came with your personal computer. Alternatively, contact the manufacturer.
4. When you receive the following message, press R to start the Recovery Console. This part of the Setup program prepares Windows XP to run on your computer.

To set up Windows XP now, press ENTER.

To repair a Windows XP installation by using Recovery Console, press R.

To exit Setup without installing Windows XP, press F3.

5. Press 1 to access your primary drive installation by using the Recovery Console.
6. When you are prompted, type the administrator password. If you do not have an administrator password, press ENTER.
7. Type cd %SystemRoot%\System32, and then press ENTER.
8. Rename the following files by using the REN command. To do this, type REN File_Name.extensionFile_Name.old at the command prompt.
* Wpa.dbl
* Pidgen.dll
* Actshell.html

Note This file is located in the following subfolder:
oobe
* Licdll.dll
* Regwizc.dll
* Licwmi.dll
* Wpabaln.exe
Note In the previous command, File_Name.extension represents the new file name. Additionally, File_Name.old represents the old file name.
9. Type the drive letter of the CD drive together with a colon, and then press ENTER. For example, you type D:, and then press ENTER.
10. Type cd i386, and then press ENTER.
11. Type the following commands individually. Press ENTER after each command:
* Expand licwmi.dl_ %Systemroot%\System32\licwmi.dll
* Expand regwizc.dl_ %Systemroot%\System32\regwizc.dll
* Expand licdll.dl_ %Systemroot%\System32\licdll.dll
* Expand wpabaln.ex_ %Systemroot%\System32\wpabaln.exe
* Expand wpa.db_ %Systemroot%\System32\wpa.dbl
* Expand actshell.ht_ %Systemroot%\System32\oobe\actshell.htm
* Copy pidgen.dll %Systemroot%\System32
12. Type Exit, and then press ENTER to restart the computer.

Well this kinda work well.. But let me shorten the steps on Solution No 5


No 5

Just get the Installation CD.. And REPAIR the godd*mn XP!!
It only took an hour....
What a day... ^_^


Read more...
Monday, February 2, 2009

soal Sisop  

.
.
Soal baru.. dikit. tapi gk ngerti
here..


mohon jawabannya


Read more...

Best Seller